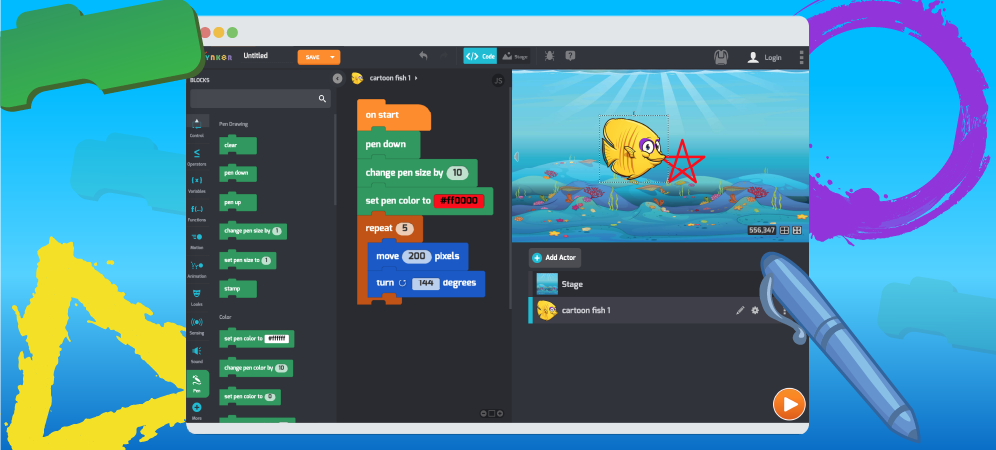
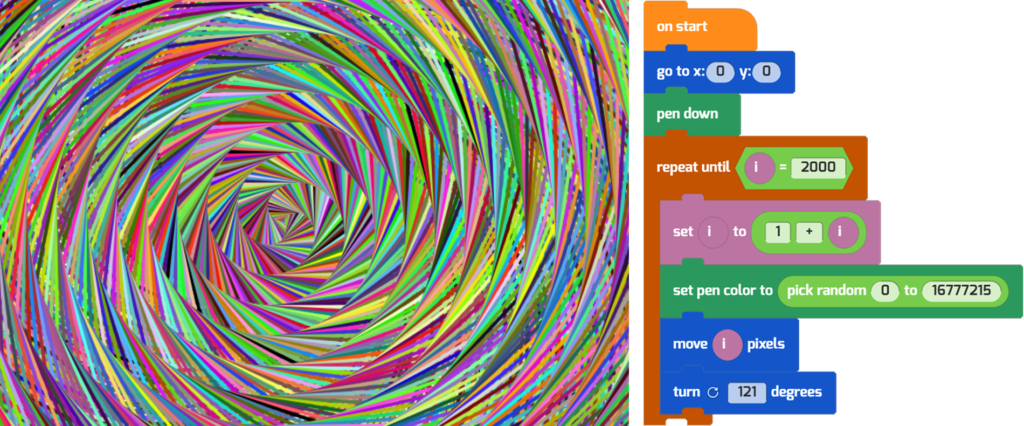
Did you know that you can use Tynker to create colorful, original drawings? This complex, spiraling image was created with just a handful of code blocks using Tynker’s Pen.
To use the Pen Blocks, you must enable them first. You’ve got two options.
Option #1: Drag any Pen block in your code, and the extension will automatically be enabled! Search for a Pen command like pen down or set pen size and use it in your code.
Option #2: You can also click More at the bottom of the coding palette, then choose Pen and Add to enable the Pen blocks.
With the Pen blocks enabled, as actors move across the Stage, they can draw lines, shapes, and much more.

Tynker’s Pen is inspired by Logo, an educational programming language created in the late 1960s. Logo was used to control robotic turtles (yes, really!) that could draw with pens. In Tynker, we’ll move virtual turtles and draw on the screen instead. The Python programing language has a similar pen-drawing tool called Turtle Graphics.
This tutorial and the Pen blocks themselves are both inspired by and indebted to Logo and the pioneering computer scientist and educator Seymour Papert. His book Mindstorms (1980) and video lecture series On Logo (1986) are still relevant today. Both are available for free online and recommended reading for computer science educators.
Table of Contents
Drawing Simple Shapes
Let’s start with some simple shapes like these to get the idea:
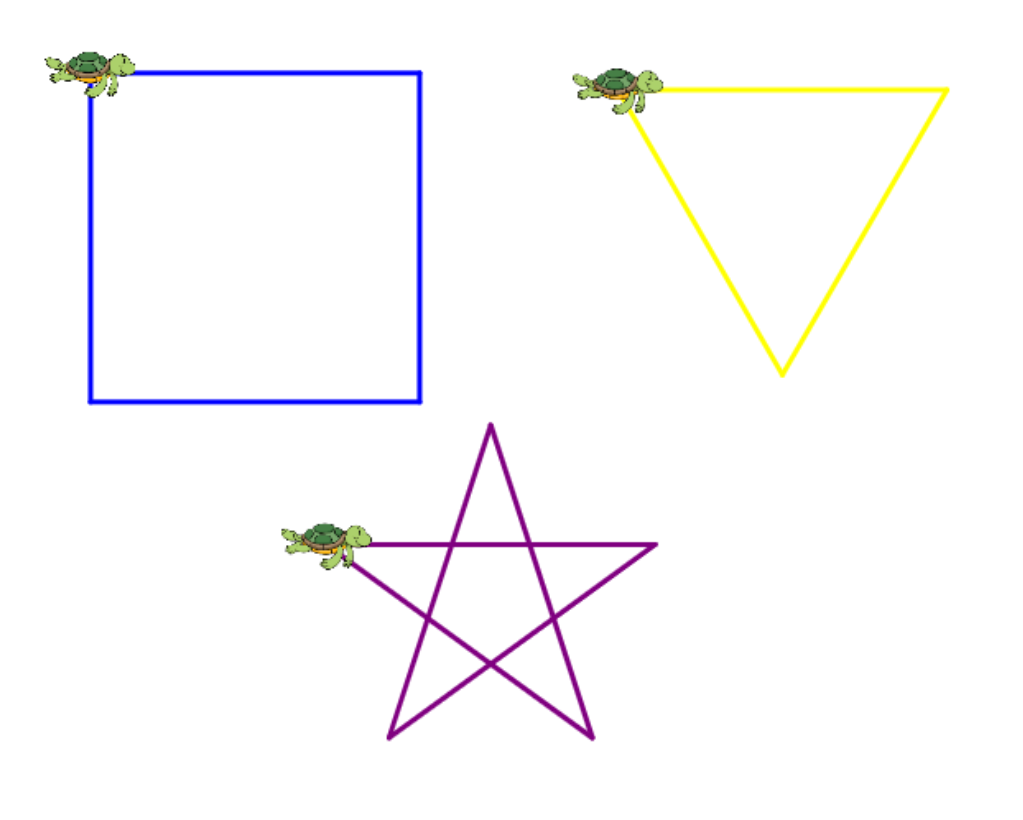
About Turtles: I’m moving around a Turtle actor, but you can use any actor as your Pen. Add an actor or draw your own (Add Actor > Media Library or Add Actor > Drawing Tool). You can change the size of your actor with the set size block.
To start drawing with an actor, use the pen down command. As the actor moves on the Stage, it will leave a trail behind it. Try reading this code first:

Try walking like a turtle before you run your code! Yes, stand up and get some exercise. Say these instructions aloud and act them out.
Move forward 2 steps (unless you have enough room to take 200 steps!), turn right 90 degrees, then repeat it another 3 times. What shape did you walk? Try drawing it with pen and paper.
Finally, run your code in Tynker and watch the actor move.
Repeating Code
We can organize our square-drawing code into a shorter program using a repeat loop.

By changing the repeat count and the turn angle, we can draw a triangle or a star instead:
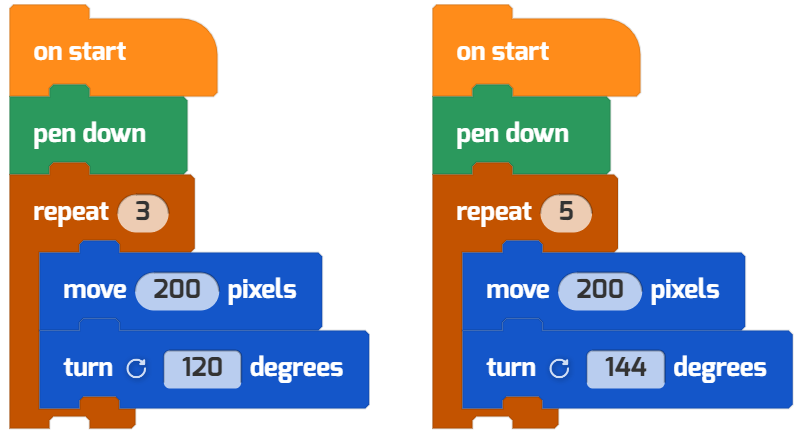
You can also change the pen’s width, color, and hue. Go ahead and experiment on your own with these commands. Try changing the color within loops and watch what happens!
To remove pen drawings, you can use the clear block. Here’s a short program that will clear the screen with a click.

Wait a Second: What’s An Angle?
That’s a very important question. An angle describes the space between two lines that meet at a single location. Let’s look at some angles of an actor’s left turn:

Angles are all around us, even in our day-to-day speech. Have you ever heard someone say, “Well, that’s a complete 180!” when someone changes their mind? A 180 degree turn is flipping directions.
Watch what happens when your actor turns 180 degrees in Tynker code blocks.
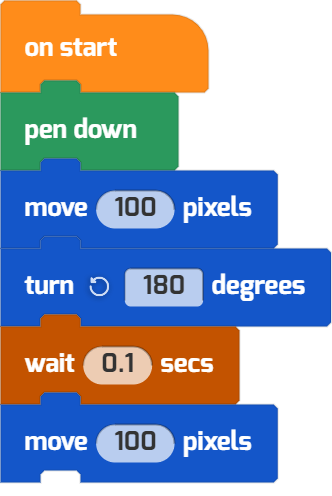
Experiment with different turning angles to get the hang of it. Try negative angles like -90. Use both the turn left and turn right blocks.
What’s A Circle?
Could you use the pen to draw a circle? Try out this loop and watch what it does. Did your turtle draw a circle … or is it a polygon?

Make the turning angle in the loop smaller. Make a prediction before you run your code again: Will your circle get larger or smaller?
Try changing the repeat count so that the Pen completes the circle. Hint: What’s 36 × 10?
Try Driving Your Turtle
Choose a background for the Stage, then navigate your new scene with your actor, with the pen down, so you can see where your actor goes. Use these three commands:

You can double-click on the blocks to run them—and move your turtle around. My turtle is now a Viking Ship making its way around the islands. Try changing the turn angles and how many pixels your Turtle moves.
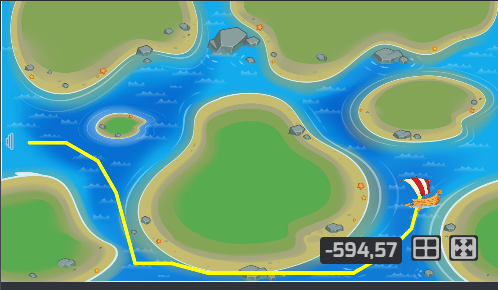
Don’t be afraid to crash into things. Turn around 180 degrees and go backwards if you have to. Just try to get a feel for angles and movement on the screen.
Drawing Shapes and Text
The pen blocks also include commands to make actors draw shapes, text, and much more. They can even clear shapes that have been drawn with the pen. Here are a few examples:
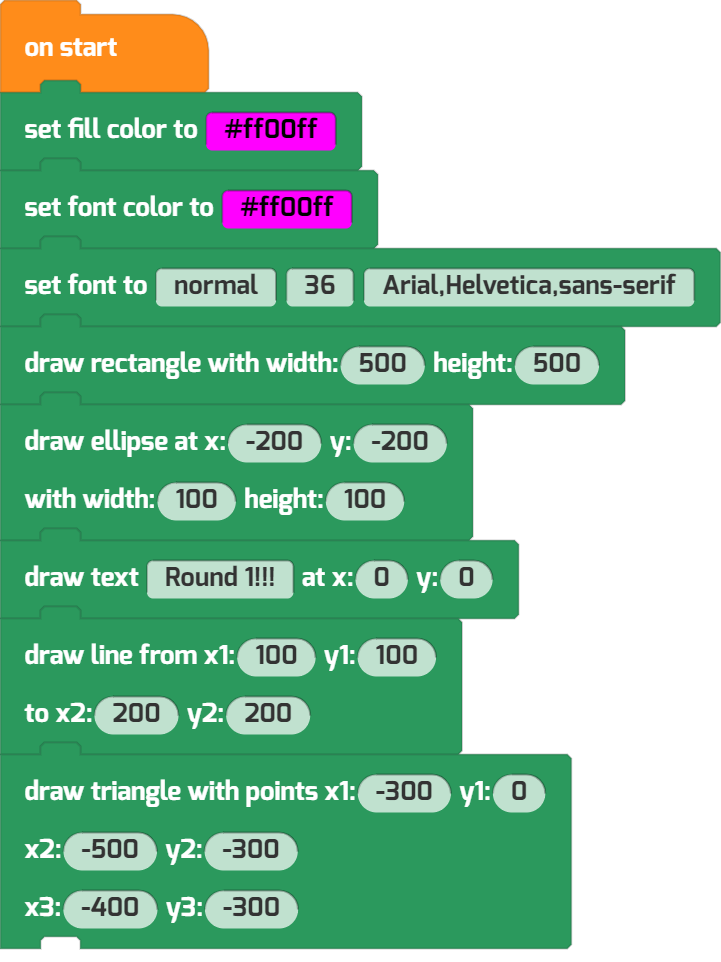
Go ahead and explore with these blocks on your own.
You can use these blocks to draw a whole city skyline with code. Or candy-colored polka dots!
Explore Functions with Pen Blocks
Pen blocks are the perfect way to explore the idea of creating your own functions. Recall how we drew a square or star—you can create a function that organizes that code into a little reusable package.
First, create a new function by going to Functions > Create Function. Name it “Draw Star” or whatever shape you’ve chosen. Then define what you want your function to do, using code blocks:
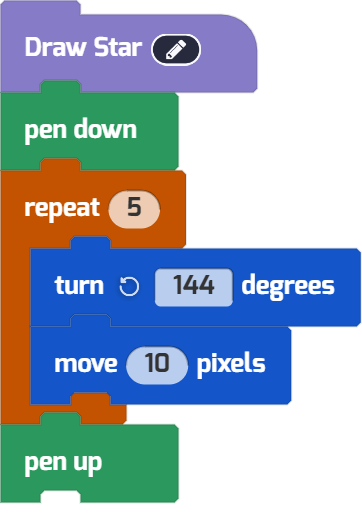
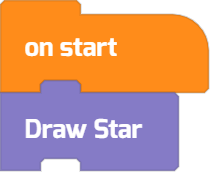
Then you can call your new Draw Star function as many times as you like, and the code will run—call your function only once or call it 50 times! Here are some examples you can try:

You can create a second function that fills the Stage with the color black. I called it Draw Space.
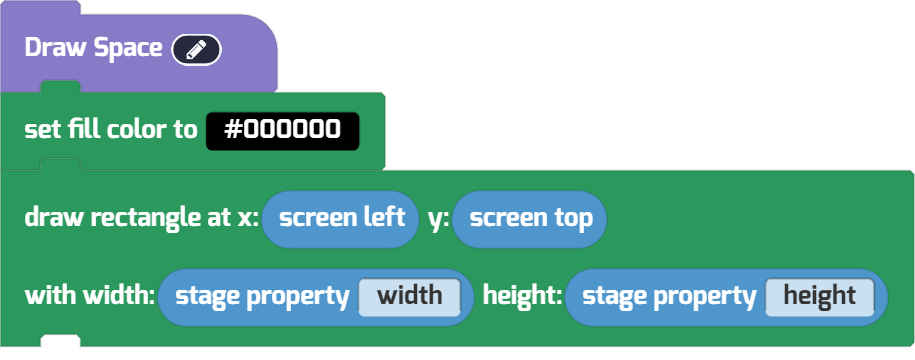
You can even call functions from within another function. Let’s try it!
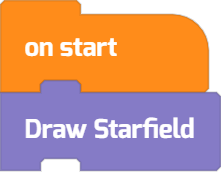
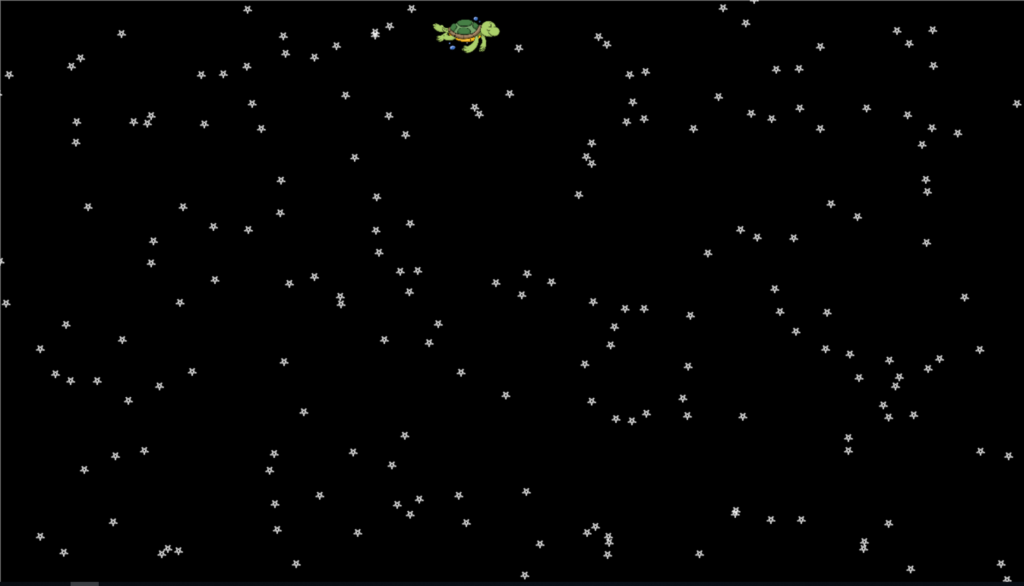
Create another function called Draw Starfield, and let’s call both Draw Stars and Draw Space from within it. First, fill the screen with black using the Draw Space function, then switch to a white pen, then call the Draw Star function at 200 random locations!
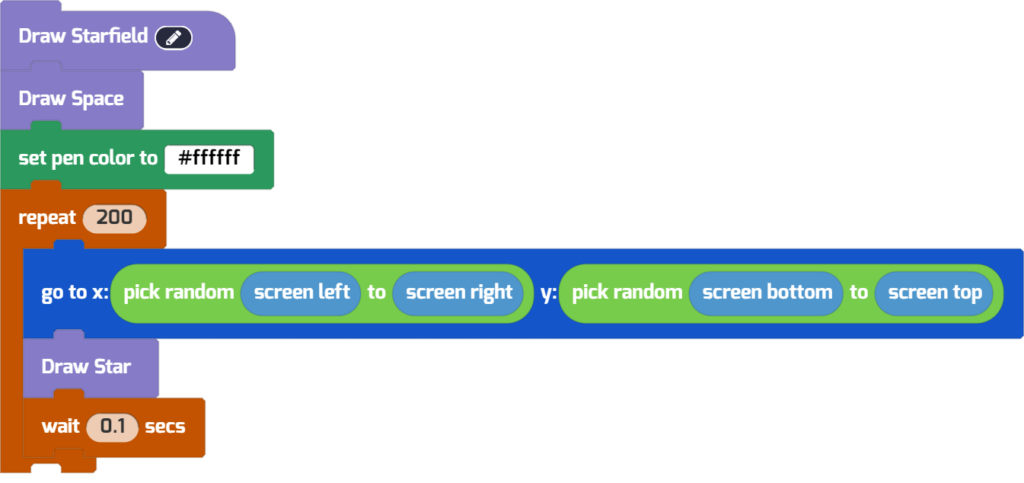
Don’t forget to add a short program that calls your new Draw Starfield function to see it in action. Change it around and make it your own!
Parameterized Functions: Are We Having Fun Yet?
Are you seeing the truly incredible possibilities of code yet?
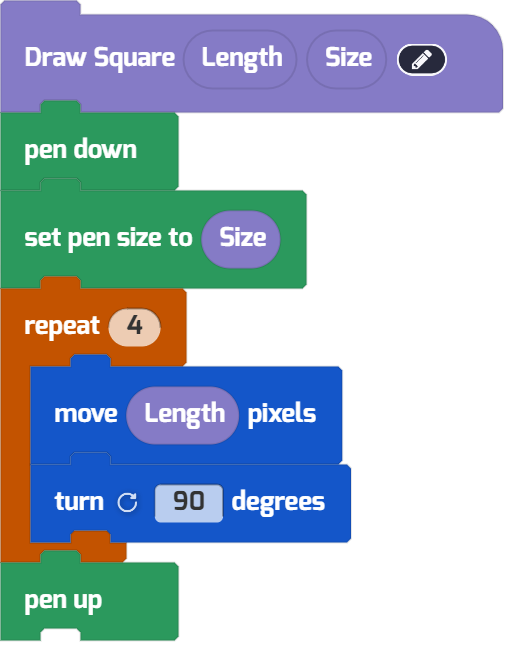
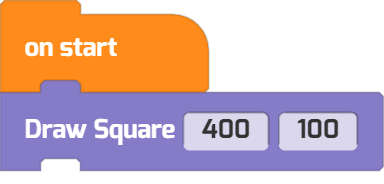
You can use the Pen blocks to understand the idea behind parameterized functions, too. Notice the Length and Size parameters for our new Draw Square function. You can drag these parameters into the function definition code blocks—we set pen size to Size and now move Length pixels. Then, when we call the function, we’ll specify how big we want the square to be and how wide the pen should be too.
Give it a try! Define it.
Then call your function, describing the square you want to draw!
BTW. You can add parameters as you Create a function. But you can click on the pen 🖊 in the function definition to add new parameters to an existing function, too.
Pen Block Magic
Want to get inspired? Give yourself a Pen block programming challenge. Check out the amazing artwork that these young programmers created using Tynker’s Pen blocks, with a limit of just 20 code blocks total! Amazing stuff from the always-creative Tynker Community.
What Next?
Try imagining your own challenge with the pen and completing it. Can you use the pen tools to draw a face? A character? Or a landscape?
Want a challenge? Explore Lazer Racer, a set of increasingly complex pen-drawing puzzles available with the Tynker App.
Want more Pen ideas? Check out these seasonal projects that use the Pen blocks:
- Rainbow Hearts
- Spiraling Shapes
- Spider Spin
- Explore these amazing kid-created Pen Projects, too! These are the winners and notable contestants of Tynker’s Draw a Summerscape challenge.
Share your own pen projects with us at community@tynker.com
Looking for more activities? Check out these Tynker Toolbox articles!
- Tynker Workshop Basics — Learn about coordinates and start coding with Tynker.
- The Animation Tool — Learn about frame-based animation and other animation tips.
- The Character Creator — Take control of custom rigs using the Animation blocks.
- Text Tricks — Work with speech bubbles and more. Tell your own stories, put on a play, or make a computer write poetry!
- The Sound Blocks — Play music with code! Add custom sound effects, too. Tynker’s brand new music tool supports MIDI and MP3.
- The Synth Blocks — Create your own sound effects and instruments! You can create crunchy dubstep drops, glitchy chiptunes, or instruments from any style of music you can imagine!
- Code Block Tricks — Get top-secret ninja tips for writing code fast in Tynker Workshop.
- The Pen Blocks — Make your actors draw as they move. Create patterns, draw geometric shapes, and more.
- The Physics Blocks — Create games or simulations with gravity, collisions, and more. Think: Angry Birds and Marble Madness.
- The Augmented Reality (AR) Blocks — Want to use video or photos in your programs? Try the AR Blocks, which let you code your own selfie!
- The Artificial Intelligence (AI) Blocks — Take your AR projects to the next level with face-, hand-, and pose-tracking. Explore what makes AI special.
- The Debugger — Learn about Tynker’s data debugger and get bug-fixing tips.
- The Tutorial Builder — Did you ever make a really cool Tynker Block project and wish you could teach the whole world exactly how you did it? Now you can!
- The Python Editor — Looking for a challenge? Ready for your next step on your coding journey? Learn Python with Tynker too, and take the plunge into text-based coding.


