Table of Contents
Programming Parrot Drones with Tynker
This is a quick-start guide to program your Parrot drone with the Tynker App. Parrot has a number of videos that you can watch to unbox and set up the drone.
Compatibility
- Drone – Parrot Rolling Spider, Night, Cargo, Mambo, Jumping Sumo (support for Jumping Sumo on iOS only), or Swing (partial support for Swing on iOS)
- Tablet – Your tablet should support Bluetooth 4.0 in order to pair with the drone. Please refer to Parrot Support to find out if your tablet is supported.
- Tynker App – Make sure you have the most recent version of the app downloaded.
Download Tynker
The Tynker App is supported on iPads. Note that in addition to Tynker, you can also download Parrot’s Free Flight App to connect to the drone.![]()
Learn to program drones

“Crash Course” trains you on how to use drone-specific commands in Tynker. The same code blocks that you use to command the virtual drone in the the puzzles program the actual drone once you pair with the real drone.
Create your first drone program
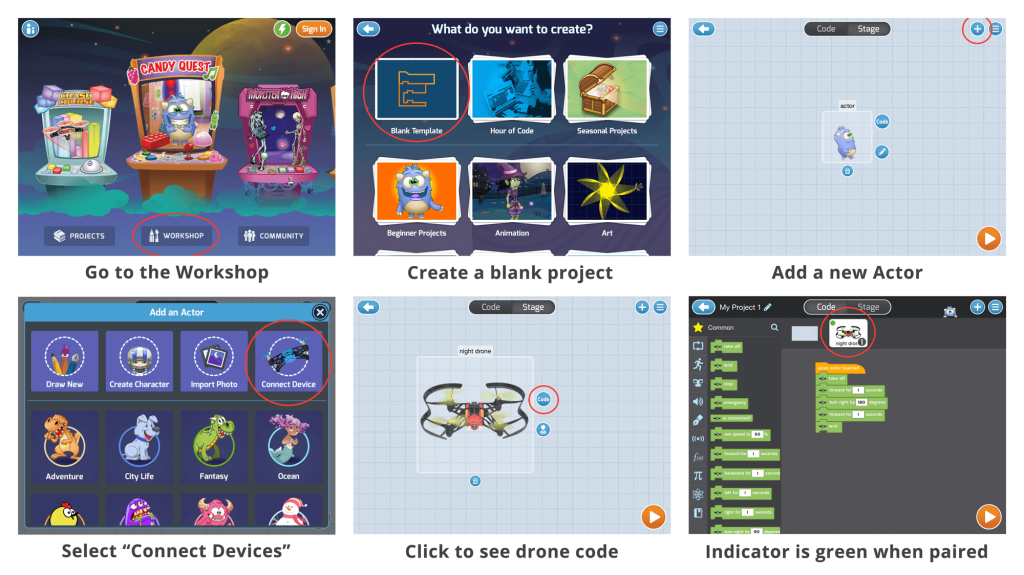
Select the “Workshop” section and start a new blank project. Add an Actor to represent the drone. You do this by selecting “+” to add an Actor, choosing the “Connect Device” category and selecting your Drone as an Actor. Once added, you’ll see that it comes with some default code.

Pairing Your Drone
Now that you’ve created a Tynker project to control your drone, you are ready to pair the tablet with the drone. Your drone may use bluetooth pairing or WiFi pairing. Most airborne drones use bluetooth pairing and most jumping drones use WiFi pairing.

Bluetooth Pairing (Airborne Drones)
Simply turn on the drone and wait for it to pair. The pairing should be automatic. Once paired, you will see a green indicator on the drone Actor in Tynker. The lights on the drone should also be green.
WiFi Pairing (Jumping Drones)
Turn on your drone, then go to your tablet’s WiFi settings. After a few seconds, you should see your drone’s name show up as a WiFi network option. Choose this option and go back to the Tynker app. When you open your drone project, the indicator next to the drone Actor should be green.
Classroom Mode
If you have more than one drone, you should turn on Classroom Mode through the Tynker app. This pairs each tablet with a single drone so that your code doesn’t run on the wrong drone by accident. This is especially helpful if you are in a classroom with many students controlling different drones.
To turn on Classroom Mode:
- Go to the Tynker app and click the user icon in the top left corner.
- You’ll need to answer a simple math question, then click the “Settings” button at the bottom of the screen.
- Click the blue “Classroom Settings” button at the top right.
- Check the “Classroom Mode” box.
- Enter the unique name of the drone (you can find this by pairing with the drone and going to the controller).
Running your first program
Place the drone on the ground in an area with sufficient clearance. Press the orange “Play” button to run the default program. The drone should take off, fly forward a few feet, turn around, fly back and land.

Drone code blocks
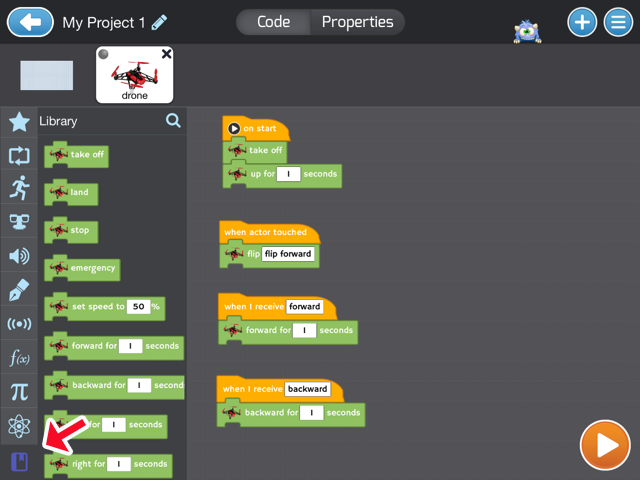
All the connected device blocks appear in the new “Library” category of code blocks.

Program ideas
Flip [Beginner]
Start with simple programs where you automate the drone’s flight path by modifying the default code. Make it flip on demand. For example, in this program, the drone flies up when you start the program and hovers. Each time you touch the drone actor, the drone flips. When you stop the program, the drone falls to the ground.

Flappy Drone Game [Beginner]
Use the pre-built template under “Game Kits” to make this simple Flappy bird style game. You can even add physical obstacles like hula hoops and fly the drone through them!
Air Controller [Intermediate]
Use this pre-built template to make your own custom drone controller using all the commands you’ve learned. Try to integrate the tilt block that uses the tablet accelerometer.
Troubleshooting
Pairing
- Make sure that the drone is fully charged.
- If there are multiple drones in the vicinity, select your specific drone under “Properties” of the drone Actor.
- You will be able to see the Bluetooth scanning and pairing status under Properties.
- If you are still unsuccessful, restart the drone and then restart the Tynker app.
Built-in Controller
- Use the built-in remote to pilot your drone by choosing the options drop-down and clicking “Control.”

Safety Precautions
- The parrot mini-drone is not recommended for children under 14.
- Please make sure that there is an adult at all times.
- Parrot’s user guides have a detailed list of precautions while flying indoors and outdoors.
Help and Support
- If you need to repair your drone or replace parts, Parrot has helpful tutorials and videos on their web site.
- More help is available at https://www.parrot.com/us/support/


