Do you use Minecraft Education in your classroom or afterschool group? It’s a special educational version of Minecraft that Microsoft makes available to educators and students. You might not have known it, but Tynker is embedded right inside of this product.
Let’s explore how you can use Tynker’s block coding editors in Minecraft Education. You’ll write Minecraft Mods, which can change the Minecraft rules — and deploy your own custom Minecraft Add-ons, which can totally change your Minecraft mobs and creatures.
If you’re an educator, your school or district might already have access to Minecraft Education. Talk with your IT specialist or Microsoft representative. Find more details about purchasing Microsoft Education edition at this page. You may also hear “Minecraft Education” called “Minecraft: Education Edition” or even “MCEE” as a nickname. These refer to the same product. (The product was renamed by Microsoft in 2023.)
Tip: Minecraft comes in many different “flavors” and varieties. Own a different version of Minecraft? If you already have Minecraft: Bedrock Edition installed, you can use all of Tynker’s modding capabilities with no additional purchase of Minecraft Education required. In that case, follow our directions for modding Bedrock instead of the instructions at this article. Find free Bedrock tutorials here and in your Tynker Student Dashboard.
Table of Contents
Open The Code Editor
One thing that makes Minecraft Education special is the integrated Tynker code editor. You can change the Minecraft rules in a snap! Let’s see how to use it. Here’s how to follow along:
Step 1. Start Minecraft Education. Open Minecraft Education and select Play > Create a New World. We recommend choosing “Creative” mode if you want to just explore for now (so you can focus on coding instead of bashing creepers or collecting resources).
Step 2. Open The Coding Window. Press “C” on your keyboard and a popup will appear. Select Tynker from the options available. You should see something like what’s shown below:
Step 3. Find A Tutorial or Project. Now you can browse through available tutorials and Tynker coursework. For example, here is the tab showing Agent Trials, a sequence of building challenges.
Step 4. Join Tynker or Login. Do you want to save your progress — or your cool custom mods? Make sure to click the “Join” button in the upper right corner and follow the instructions.
Tour of the Code Editor: Write A Simple Mod
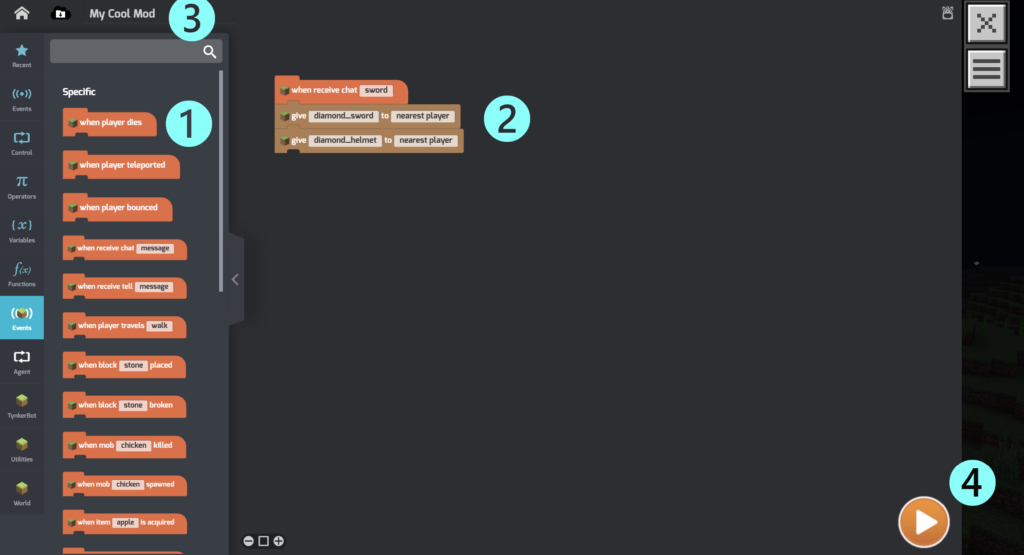
Want to try writing your own code? Go to My Projects following the steps above, then choose Create Mod. You should see the code editor appear, something a little bit like what’s shown below.

You write code by dragging and dropping blocks from the Coding Palette shown at ❶. Click on the categories at left. Notice how you can Search 🔍 for available blocks, too.
You write commands by dragging them into the Coding Area ❷.
Write something cool? Give your program a meaningful name and Save it ❸.
Hit Play ❹ to deploy your code, then press the X to return to Minecraft gameplay.
Return to a list of all available Tynker courses by clicking the Home 🏠 button in the upper left-hand corner.
Diamond Gear Mod
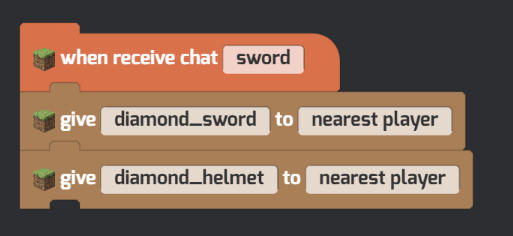
Try writing a program that looks like this, that gives the nearest player an item when a chat command is entered:

Change up the program so it gives you whatever you like. Change the chat message, too. Then it’s time to try it out. Here’s how to deploy your new mod and see it in action:
Step 1: Write Your Code. Make sure all the blocks are connected! You can “trash” an unused block by dragging it back to the Coding Palette (to the left).
Step 2. Press Play. Press the big orange Play button to deploy your mod. Then close the coding window (the X button) to return to Minecraft gameplay.
Step 3. Make It Happen. Depending on what code you wrote, you may trigger the event in Minecraft. In our case, our program runs whenever the player enters “sword” into Minecraft chat. Here’s what success looks like! Press T to open Chat and make sure to press “enter” after writing your message.

Your first mod! Nice work! Keep going through Tutorials and the Agent Trials courses.
Add-Ons with Minecraft Education
Add-ons let you customize your Minecraft experience. In particular, you can change how Minecraft mobs look and behave. Mobs are anything that moves in your Minecraft world: Think Creepers and Endermen, but also animals like Turtles and Pigs.
Want to make totally custom mobs in your Minecraft Education world? Follow the steps described in the article linked below, it’s the same as the process for Minecraft: Bedrock Edition.
Or just watch the informative video below. Transform your ordinary horses into wild unicorns!
Find STEM Activities in Minecraft Education
Looking for even more fun starter activities to try with your class? Try one of Tynker’s Minecraft courses. Or explore some of the pre-built worlds designed for topics like Science, Mathematics, or History. Find them in the Library — visit View Library > Subject Kits.
You can find helpful pre-built Biomes and Build Plates in the Starter Worlds section of the Library, too!
If you enjoyed this article, check out our recommended Minecraft resources below for your kids.
Minecraft Resources
Minecraft Skins, Items, and More
Live Minecraft Classes with an Expert
Build a Minecraft House with Code!
Benefits of Minecraft — Guide for Parents
Check out Tynker’s Curriculum and learn more about inspiring the next generation to change the world through code.


